A New Table
Playing games is really fun but I realized that my dining room table that I usually play on was a little small. As I enjoy playing X-Wing, the official table mat size is 36″ x 36″ and my current table was not big enough for that. While I explored many options such as purchasing a table or maybe even getting a plastic folding table I thought that this would be cumbersome to take out every time. As a temporary solution I picked up a sheet of peg board and put that over my existing table but it was a bit of a hassle as I had to break it down every time when I was finished. While looking at the space I had, I realized that I could just get a bigger table. 
At this time I was thinking how it would be pretty cool to have a board gaming table but the cost to buy one was pretty expensive. Then I saw some do-it-yourself blogs and I though why not make one. So, I did. This is the story of the journey I took.
Before I started, I had to ask myself a few questions.
- How big did I want the table to be.
- What features did I want on the table.
- What should I make the table out of.
- What should the finished product look like.
- How much did I want to spend making the table.
Some of these questions were easily answered by me. If you wanted to use this as a table making guide these questions can only be answered by you and what you have to work with. Obviously I wanted the table to be at least 36″ x 36″ to play X-Wing on. As there are cards involved I thought it would be nice to be a little bigger. For the space I have to work with, I decided on going with a 45″ x 45″ final size as this would fit in my dining area and still work if I used a plywood sheet for 4′ x 8′. Also, in addition to X-Wing, other larger table space games could also be played on this. I saw many extra features that people put in such as LED Lights, TV’s, electrical outlets, cup holders and card holders. I felt I really didn’t need most of this extra stuff but maybe a cup holder would be nice to have. Finished Pine seemed to be what was a good standard of what people used to make the sides of the table. I decided that I would steal the metal legs from my old table as this would save on cost as I did want to keep that down. With my initial ideas down, I set out to start making the new table.
I had a piece of cheap grade 4′ x 8′ osb lying around and felt that this would be good enough as it would be covered with some sort of foam topper and doesn’t have to look nice on the outside. I then picked up two 8′ 1″ x 4″ pine boards. Then I cut the osb down to size along with some 2″ x 6″ boards that I also had laying around for what I would nail the pine sides to. I realized that I should have sanded the 2″ x 6″ boards first but I screwed them in first which made sanding them much more difficult.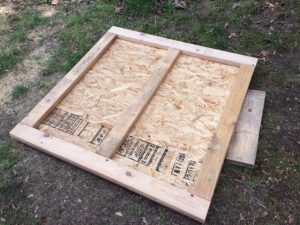
Then, I used the chop saw to cut the 1″ x 4″ pine board down to size. I wanted to cut these boards at a 45 degree angle to get a cleaner looking edge. Cutting these to make the 45 degree angles fit together was a real brain burner for me. 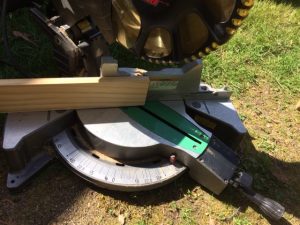
At this point, I pre-fit the pine boards and realized that something was off as they did not exactly line up. I thought that they would fit when I nailed them into place as this would pull them in. After nailing a few sides, I new it was not right. I went ahead and finished nailing everything in and there were 1/2″ gaps on a few sides which bothered me a lot.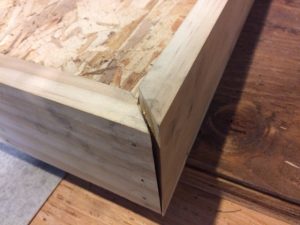
In the end, I used wood filler to fill the gaps. I should have pre-measured more. I think my osb was a bit off and so was my placement of the 2″ x 6″ boards. A few were hanging over the edge of the osb and not flush which made it off more. After drying the wood filler did a much better job then I thought it would and didn’t look as bad.
After much sanding, I was getting closer. I sanded the pine sides down with continuously finer sand paper. Starting at 40 grit, then 70 grit, 120 grit and then finally the recommended 220 grit. Looking back again, I probably should have spent even more time with some of the mid ranges for an even better finish. The pine was also a very soft wood and I nicked it a few times with some metal tools.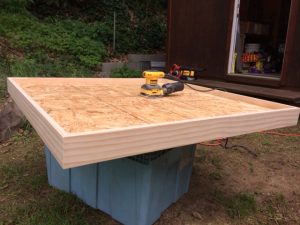
When I felt that I couldn’t sand any more, I moved on to the stain. I applied four coats of the lightly wood looking stain. Then I added about three coats of polyurethane to protect the finish. This should all be done in a well vented area or somewhere where you will not smell the very toxic fumes. Also, as they say, this is difficult to apply correctly. There are bubbles that form when applying and the best way to pop the bubble was to lightly go over it with a bristle brush. Another thing I learned was that this needs to be done in a well lit area. I had some lighting but i feel that ultimately it was not enough and was difficult to see some of the smaller bubbles.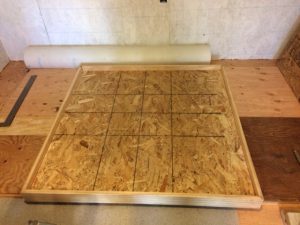
After drying, I moved the table to the spot it was going to be. I didn’t realized how heavy it was going to be and how awkward it was to carry by myself. I should have waited for a helper carrier and to do the next part. Attach the legs. As I realized how heavy the table was and how soft the pine was, I didn’t want to rest it on the pine to attach the legs. I did and it worked out but I might have put something down so I could turn the table upside down and rest it on the middle of the osb to put on the legs next time.
The legs of the old table are made out of some sort of metal and some of them were rusting in places. 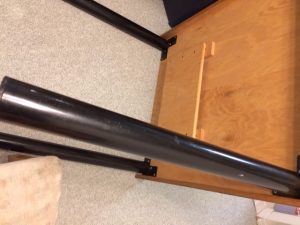
After taking them off the old table, I sanded them down and painted them black with spray paint. This turned out well for all the legs except one. This one leg was the one with the most rusting and had to be sprayed a bit more. I sprayed a bit too much and the paint started to run. You really wouldn’t notice it unless you knew it was there.
After attaching the legs it was again very difficult to pick the table up and rest it on the legs. Also, the way the legs attached is by a few short screws that is not 100 percent solid. It has been up for about two months now and seems fine for the most part.
I had some foam lying around the house that I got and was going to use that as the base for the inside of the table. The foam was gray on one side and black on the other. I wanted the black part facing up. The problem was that the foam was not square and in a kind of diamond shape. It was also curling up on the ends as I had it stored rolled up. This made measuring the foam difficult. I also had to cut the foam with the gray side facing down as I found it easier to cut. As the foam was oddly shaped, I was not able to get two rectangles but had to get two odd facing shapes. 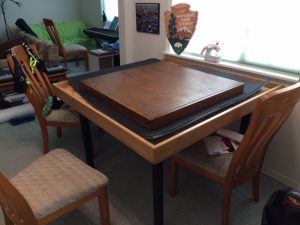
I them made the mistake of not measuring on the correct side so one side is black and the other gray. I did not have enough foam to re-do this part.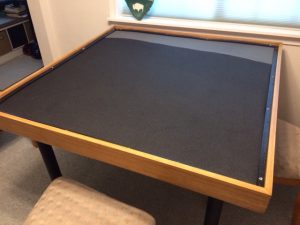
To hold the foam in, I wanted to use some molding that would but up against the pine board on the inside. Using the scrap pieces of osb I had laying around I proceed to cut them down and sand. After sanding a couple of them down, I realized that they are pretty fragile as they are so thin. I didn’t think anything of this as I had lots of this osb lying around so I just cut another piece. After more sanding, I was done. I finished off by painting them black.
I pre-drilled some holes in the molding so they wouldn’t crack and proceeded to drill them in through the foam and into the top of the osb. My mistake was that the foam was fairly thick so when the screw caught the osb and pulled the moulding down, they cracked. I just need to use stronger wood here.
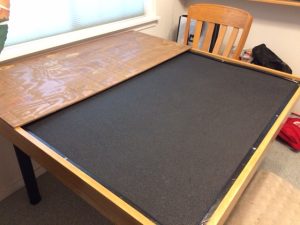
For the table top cover, I had more wood lying around. I had some T1-11 siding that I decided would be good for the topper. I cut two pieces down and proceed to sand. After sanding the first layer, I quickly realized that the T1-11 is not flat. It becomes a bit wavy. I continued to sand and used it anyway. After staining, I cut some strips of osb to glue to the bottom of the topper to act as stoppers to keep it from sliding off the table. Then I glued down some extra black fabric that would prevent the topper from scratching the pine top.
Done! Of course I am not really done but in my mind it is done. I can easily re-do the moulding and also the foam topper which I think I will do at some point. I might even get a nicer piece of wood that this not wavy to replace the T1-11 topper. I also want to build wood cup holders that would cam or slide on top of the pine siding. This project took me about three months to finish working one it sometimes more, sometimes less.
I learned a lot from this project. I am hopping this table will last me another two to three years and then I may want to make another better one incorporating the things I learned from making this one.